 Ever wish you could show someone exactly what you’re looking at? Perhaps you’ve got an error message on your screen and you’re working with CTTS to resolve it. Perhaps you want to show your boss the graph projection in Excel, but he just needs to see the chart. Or perhaps you’re training someone on your line-of-business software and you’re creating a reference sheet for them. You can accomplish all these tasks and more by using the built-in Snipping Tool that comes with Windows.
To open Snipping Tool, click Start and just start typing snipping tool.
The icon looks like this:![]()
Click on it, and Snipping Tool will open.
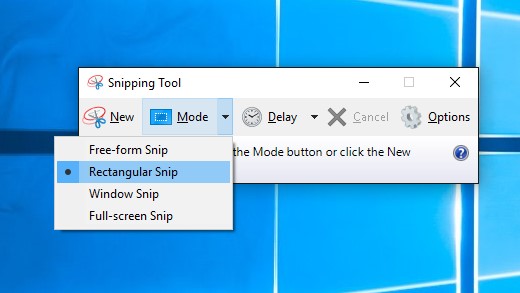
Depending on your version, it will look something like this:
Select the type of snip you want. For Windows 10, see above. For earlier versions, select the arrow next to the New button.
Select the area of the screen you want to capture.
- Free-Form Snip – draw with your mouse or touch screen around the area you wish to share
- Rectangular Snip – Select a rectangular area
- Window Snip – a single click captures the entire area
- Full-screen Snip – a single click captures the screen
If you want to capture a menu, after you open the snipping tool, open the menu to be captured. Press Ctrl + PrtScn. This captures the entire screen, including the open menu. Select Mode, then choose the type of snip you want. I find that Rectangular Snip is the best option for menu captures. You could also use the Delay option in Windows 10 Snipping Tool.
After you capture a snip, you can write or draw on it by selecting the pen or highlighter buttons.

Once you are done with your screenshot, you can save, copy or email using the Snipping tool buttons.
I recommend pinning this useful application in the taskbar for easy access. Now you can show anyone what you see on your screen!
Visit Microsoft Support for more information.
Questions about other Microsoft tools?
Contact CTTS today: (512) 388-5559

By Josh Wilmoth
CEO, Central Texas Technology Solutions
